Automation is a key element of modern software development and deployment. GitHub with GitHub Actions allows you to automate many tasks, starting with your continuous integration and continuous deployment... but GitHub Actions a lot more than a CI/CD, you can use it for provisioning your environments, automating some project management tasks. However, it is not the purpose of this post, where I want to focus on the development of your own Github Action!
An "Action" is the reusable component of a workflow, and when you create your automation you will start by searching the GitHub Marketplace to look for actions to achieve a specific task. In addition to the thousands of actions available on the marketplace, and available in open source communities, you can create your own actions.
This blog post will guide you using a concrete example, through the steps to create your actions, and this is just "my version" of the official Creating Actions documentation chapter.
Let's say for example that you want to enforce the fact that your repositories have always a README.md and a LICENSE file. And when the repository is not compliant with these rules the workflow should fail and provide clear information to the user.
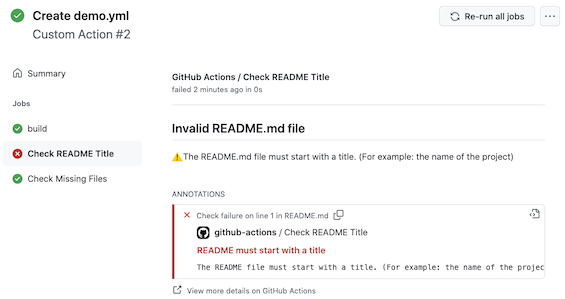
The following screenshot shows messages and alerts raised by the actions during an integration workflow:
📕 In this first post, you will learn how to:
- Create an action
- Publish the action
- Use the action in a workflow
- Add some logic to control the workflow's success or failure.
📗 In a second post, you will learn how to:
- Create custom Checks
- Add some detailed annotation with reference to source code (lines) with error
- Deploy the action
If you prefer a video version of it, take a look to "Build Your Own Action" on YouTube.
It is time now to dive into the example!
Note: the goal is not to create a real action that you can use as it is in your workflows, but to focus on the development an Action and use GitHub APIs.
Create a Javascript Action
You can write an action in Javascript/TypeScript, or using a Docker Container. In this example, you will learn how do it in Javascript.
1- Add a new Github Repository
The action will be located in a public repository to be consumed by the workflows, so let's create a new repository.
I am using the https://cli.github.com/, if you do not have it, you can create the repository from GitHub Website and clone the repository locally.
gh repo create <YOUR-ORG>/check-files-action \
               --public \
               --gitignore "Node" \
               --license "ISC" \
               --enable-wiki=false \
               --description "My first GitHub Action" \
               -y
This the gh repo create command, with these parameters, creates the repository and clone it in one step.
You can now open the check-files-action folder with your favorite editor, in my case VSCode
code check-files-action
If you are interested to see the sample code you can look at this repository:
2- Initialize the Node project & add dependencies
2.1 - In the project directory, run the npm command to initialize the application
npm init -y
2.2 - Add Dependencies
GitHub Actions comes with a toolkit to interact with the GitHub and Workflows APIs:
@actions/core: Core functions for setting results, logging, registering secrets, and exporting variables across actions@actions/github: returns an authenticated Octokit client. See https://octokit.github.io/rest.js for the API.
Install these dependencies with the following commands:
npm install @actions/core @actions/github
3- Update the .gitignore file
The Workflow runners will use your project repository to get the code and execute it directly. So all information needed for the execution of the action must be present.
This is why you must keep the node_modules and related directories (dist).
🚨 We need to be sure that the dependencies are part of the project, so for this, we need to remove the node_modules and dist entries from the .gitignore file.
So edit the .gitignore file and comment the node_modules line:
...
# Nuxt.js build / generate output
# dist
...

# Dependency directories
# node_modules/

...
4- Add the metadata and main Javascript files
The action is define by an action.yml located in the root directory of your project.
name: 'File Check Action'
description: 'An action that checks if the LICENSE and README.md files exists'
runs:
  using: 'node12'
  main: 'index.js'
In the next blog post, I will go into more detail about this configuration file. For now, let's keep it as simple as possible.
As defined in the action.yml, you need to create an index.js file. This js file is the entry point for the logic of your action.
const core = require('@actions/core');
const github = require('@actions/github');

(async () => {
    try {
        core.notice('Check File Action called!!!');
    } catch (error) {
        core.setFailed(error.message);
    }
})();
This first version of the Action is simply printing a message when called by a workflow.
5- "Deploy" the action
As mentioned before, a workflow references Action using the Github repository location. This means that when I talk about deployment, it is simply pushing the code in the repository.
git add .

git commit -m "first action test"

git push origin main
Use the action in a workflow
Even if the action is not that exciting, we can already use it in a workflow and learn more about it. We could use the same repository, but I like it to be more representative of a real-life use-case, to create a new repository with a simple workflow.
1- Create a simple repository
Same as earlier, let's create a new repository, this time private, and we will not add any license file.
gh repo create <YOUR-ORG>/to-test-my-action \
               --private \
               --description "To test my actions" \
               -y
2- Create a simple workflow
💡 Tip: An easy way to add a workflow:
You can open the newly created repository using the GitHub CLI:
gh repo view --web <YOUR-ORG>/to-test-my-action
2.1 - Click on the Actions tab, and click on the Simple workflow suggestion
This will generate the following content:
name: Simple Workflow

# Controls when the workflow will run
on:
  # Triggers the workflow on push or pull request events but only for the main branch
  push:
    branches: [ main ]
  pull_request:
    branches: [ main ]

  # Allows you to run this workflow manually from the Actions tab
  workflow_dispatch:

# A workflow run is made up of one or more jobs that can run sequentially or in parallel
jobs:
  # This workflow contains a single job called "build"
  build:
    # The type of runner that the job will run on
    runs-on: ubuntu-latest

    # Steps represent a sequence of tasks that will be executed as part of the job
    steps:
      # Checks-out your repository under $GITHUB_WORKSPACE, so your job can access it
      - uses: actions/checkout@v2

      # Runs a single command using the runners shell
      - name: Run a one-line script
        run: echo Hello, world!

      # Runs a set of commands using the runners shell
      - name: Run a multi-line script
        run: |
          echo Add other actions to build,
          echo test, and deploy your project.
2.2 - Adding our action to the Workflow
Before saving the file, add the following entry to add our newly created action to the workflow:
      # Call my powerful action!
      - name: Check Files
        uses: <YOUR-ORG>/check-files-action@main
As you can see it is very simple, just add
uses: <YOUR-ORG>/check-files-action@main
To point to the action with the proper tag (in our case for now we are using main branch).
3- Call the workflow
To call the workflow, you can simply commit/push the file to the repository.
The workflow should be automatically executed since it is triggered by any push on the main branch and related pull-request.
See the top of the workflow file:
  push:
    branches: [ main ]
  pull_request:
    branches: [ main ]
4- Check the execution
The workflow has been executed, so you should be able to see the result of it in the Actions tab, click on the workflow instance and you will see an annotation, like the following screenshot.

🎉 - Congratulations, you have created your first GitHub Action!
Let's now add some logic to it.
Add some logic to the action
Now that we have the "core" of our action we need to add some logic to checl if the files exists and check the content of the README.file.
Then if the file are not correct we should create some checks that will be visible to the developer.
1- Edit the index.js to add some functions
In the index.js file let's add a function that test is a file is present:
- if presents just log the information
- if not present, the job fails and an annotations is added
const core = require('@actions/core');
const github = require('@actions/github');
const fs = require("fs");
const { connected } = require('process');

async function checkFileExistence(path) {
    return fs.promises.access(path, fs.constants.F_OK)
    .then(() => {
        core.info(`${path} exists`);
        return true;
    })
    .catch(() => {
        core.setFailed(`${path} does not exist`);
        return false;
    });
  }

(async () => {
    try {

        checkFileExistence("README.md");
        checkFileExistence("LICENSE");

    } catch (error) {
        core.setFailed(error.message);
    }
})();
The highlighted lines shows how to use the GitHub Action core API to log some information in the console, and more "importantly" how to fail with an error message, that will be visible
- in the console
- as an annotation attached to the workflow execution.
2- Test the new code
Once you have modify the index.js, commit and push your action code to main.
Then go to the workflow that you have used to test, and re-run it, or invoke it manually.
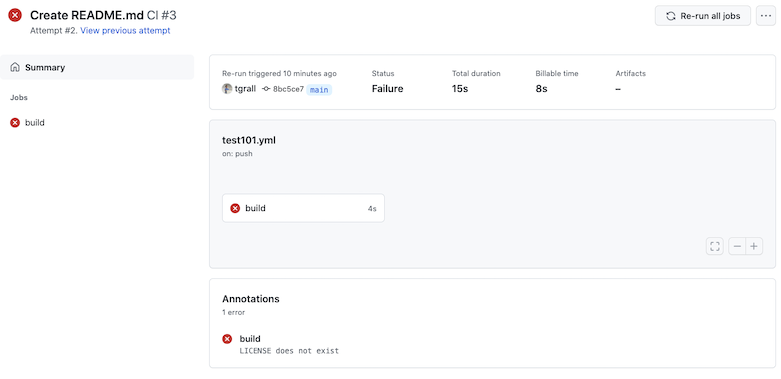
You will see, depending of your repository that the workflow fails with some messages. In the following image, the README.md is present but not the LICENSE one, so the workflow fails.
🎉 - Congratulations, your Action is checking the validity of the repository.
I invite you to do some test, for example add a README.md file, run the workflow, add a LICENSE, ...
You will see that when the two files are present, the wofklow execution is successul.
Conclusion
In this first article you have learned how to:
- Create a Javascript action
- Deploy and use it in a workflow
- Add some user feedback using GitHub Action core API.
In the next article we will add more logic to check the content of the README.md file and learn how to create detailed checks and annotations.
If you have questions, commemnts about this article, you can use the following GitHub Discussion.