
5 posts tagged with "automation"

View All Tags

ยท 7 min read

GitHub Self-Hosted Runner Autoscaling with Kubernetes

In this article, you will learn how to use Kubernetes to run GitHub Actions self-hosted runners on-demand. This enables you to auto-scale your runners based on the number of queued jobs, and quickly respond to spikes in workflow activity.

I will focus on GitHub Enterprise Server, but the same concepts apply to GitHub.com, and this post is based on the work of the Actions Runner Controller team and Natalie Somersall

GitHub Actions is a great way to run your CI/CD workflows. However, it can be complex to run a large number of self-hosted runners. Using Kubernetes to auto-scale your runners you can simplify the management of your runners. The actions-runner-controller is a Kubernetes controller that manages self-hosted.

You can find a video of this article on YouTube:

ยท One min read

A long-awaited feature is now available on GitHub: share actions in your workflows in your enterprise from Internal Repositories ๐Ÿค– !

When a developer does not find a suitable GitHub Action in the Marketplace, they can create their own, something that I have documented in the "How to Write Custom GitHub Action" post.

Until today, Actions had to be stored in a public repository, to allow other repositories to use them in workflows (or take a complex approach). This has changed ๐ŸŽ‰.

Now you can put your actions in an internal repository; repositories visible to your whole enterprise.

Once your repository visibility is set to "Internal", in the Settings pages, click in the Actions section and select the proper Access configuration:

GitHub Actions Access

The following video shows this feature in action:

ยท 5 min read

In the first blog post of this series, I have explained how to create a custom GitHub Action that is interesting when you do not find the action that you need on the GitHub Marketplace.

I will now focus on some interesting API that you can use when building an action: Checks & Annotations.

It is import, when a workflow is running to provide visual feedback to the user. This is where the checks and annotation API is handy as it allows you for example indicates to the user that a specific step has failed ( โŒ ) or was successfully ( โœ… ) executed; and using the API it is also possible to create a detailed annotation that points to a specific line of code; this helping the user to understand what is going on in the workflow.

The following screenshot shows the annotation API in action:

Workflow Annotations

๐Ÿ“— In this second post, you will learn how to:

  1. Create custom Checks
  2. Add some detailed annotation with reference to source code (lines) with error
  3. Deploy the action

If you prefer the video version of this post go to Github Actions: Create custom Checks and Annotations .

It is time now to dive into the example!

ยท 10 min read

Automation is a key element of modern software development and deployment. GitHub with GitHub Actions allows you to automate many tasks, starting with your continuous integration and continuous deployment... but GitHub Actions a lot more than a CI/CD, you can use it for provisioning your environments, automating some project management tasks. However, it is not the purpose of this post, where I want to focus on the development of your own Github Action!

An "Action" is the reusable component of a workflow, and when you create your automation you will start by searching the GitHub Marketplace to look for actions to achieve a specific task. In addition to the thousands of actions available on the marketplace, and available in open source communities, you can create your own actions.

This blog post will guide you using a concrete example, through the steps to create your actions, and this is just "my version" of the official Creating Actions documentation chapter.

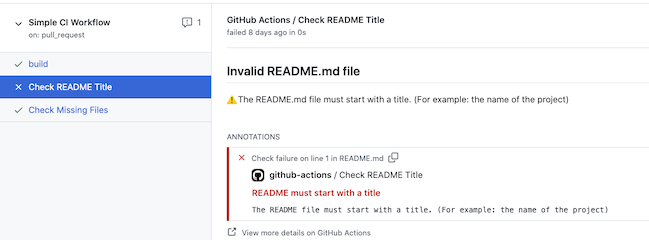
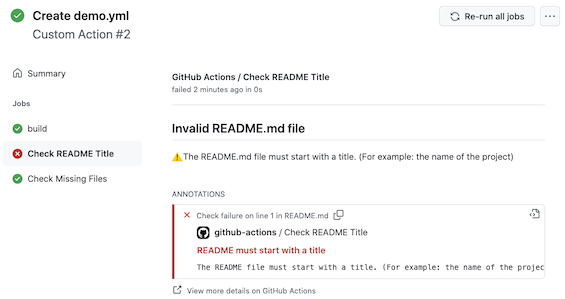
Let's say for example that you want to enforce the fact that your repositories have always a README.md and a LICENSE file. And when the repository is not compliant with these rules the workflow should fail and provide clear information to the user.

The following screenshot shows messages and alerts raised by the actions during an integration workflow:

Workflow Checks

๐Ÿ“• In this first post, you will learn how to:

  1. Create an action
  2. Publish the action
  3. Use the action in a workflow
  4. Add some logic to control the workflow's success or failure.

๐Ÿ“— In a second post, you will learn how to:

  1. Create custom Checks
  2. Add some detailed annotation with reference to source code (lines) with error
  3. Deploy the action

If you prefer a video version of it, take a look to "Build Your Own Action" on YouTube.

It is time now to dive into the example!