As part of my on-boarding/training at RedisLabs I continue to play with the product, and I have decided today to install a local 3 nodes cluster of Redis Enterprise Software (RS); and show how easy is to move from a single node/shard database to a multi nodes highly available one.
Once your cluster is up & running, you will kill some containers to see how the system automatically fail-over to guarantee service continuity.
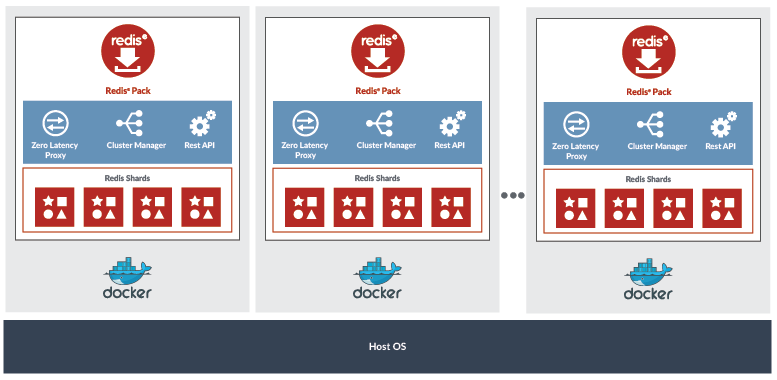
The deployment will look more or less like the schema below, (coming from RedisLabs documentation)
This is a perfect environment for learning, developing and testing your applications, but it is not supported in production; for production, you can use:
- Redis Cloud
- Redis Enterprise Software with Kubernetes and Red Hat OpenShift
- Redis Enterprise Software with Kubernetes Operator on PKS (Pivotal Container Service)
- Redis Enterprise for Pivotal Cloud Foundry (PCF).
Prerequisites:
- Docker Desktop (I am running Docker on Mac)
Installing and Running your First Redis Node
As usual, installing a new product with Docker is very simple just run the following command:
docker run -d --cap-add sys_resource \
--name  redis-node1 \
-p 8443:8443 \
-p 9443:9443 \
-p 12000:12000 \
redislabs/redis
Let's look at the parameters used here:
-d: run the container in the background--cap-add sys_resource: add Linuxsys_resourcecapabilities to set proper privileges--name redis-node1: naming the container-p 8443:8443: to access the management web UI (HTTPS)-p 9443:9443: to access the REST API (HTTPS)-p 12000:12000: the TCP port that we will use for the database endpoint on this noderedislabs/redis: use the RedisLabs image (the enterprise version of Redis)
Creating a new Cluster
Once the container is started you can configure the "cluster".
- Go top https://localhost:8443/ (accept the connect using the temporary certificate)
- Click "Setup"
- Change the Cluster Name to "my-redis-cluster.tug-demo.com"
- Click "Next"
- On the "cluster authentication" click "Next" (we will be using the free version)
- Enter the user admin credentials and click "Next".
Once it is configured, connect to the console to the console using the credentials you have created.
Adding a new database
Now you have to create a new database.
- Select "Redis Database" and "Single Region"
- Enter the name "test-db-001", and "0.5" for the memory limit
- Click "Show Advanced Options"
- Enter 12000 in the "Endpoint port number" field
- Click "Activate".
After fewseconds, the database is created and available.
Note: we have not set anything special around clustering and replication; we will do that later.
Using the Single Node Database
You can now connect to the database. You can use redis-clifrom your host, or you can connect to the container and do it from there:
> docker  exec-it redis-node1 /bin/bash

redislabs@0a174e819a6b:/opt$ redis-cli -p 12000

127.0.0.1:12000> SET foo bar
OK

127.0.0.1:12000> GET foo
"bar"

127.0.0.1:12000>  exit
Checkpoint
So far you have:
- Install a single node cluster of Redis Enterprise using Docker
- Create a new cluster
- Created a database that listens on port 12000.
In the container, run the rladminstatuscommand, to get information about your deployment.
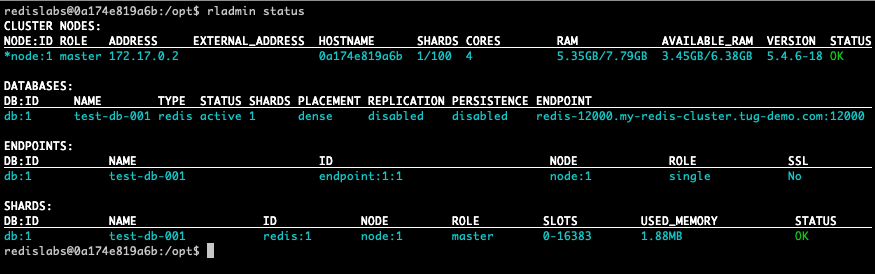
In the cluster node section, you can see the address of the node, 172.17.0.2 in my case. This is the IP address of the container, that will be used to create the multi-node cluster.
It is time to add new nodes to the cluster and enable replication and sharding
Adding new nodes
To add new nodes to the cluster, you start new containers. Since the 3 containers will be running on the same host, it is necessary, to avoid conflicts, to use different mapping to the Web UI, REST API, and database endpoint ports.
Start node 2:
docker run -d --cap-add sys_resource \
--name redis-node2 \
-p 8444:8443 \
-p 9444:9443 \
-p 12001:12000 \
redislabs/redis
Start node 3:
docker run -d --cap-add sys_resource \
--name redis-node3 \
-p 8445:8443 \
-p 9445:9443 \
-p 12002:12000 \
redislabs/redis
So to configure each node you need to use the URLs:
- node 2: https://localhost:8444/
- node 3: https://localhost:8445/
I have just increase the port number of the Web UI (8443: node 1, 8444: node 2, 8445 node 3).
For these 2 new nodes, do the following steps to add them to the cluster:
- Click "Setup"
- In clusterconfiguration, select "Join Cluster",
- Enter the IP address of the first node, 172.17.0.2 in my environment
- Enter the credentials you have used during the installation of the first node.
- Click "Next"
After a few seconds, you will be redirected to the home page and see the list of nodes of your cluster.
Repeat the same steps for the third node.
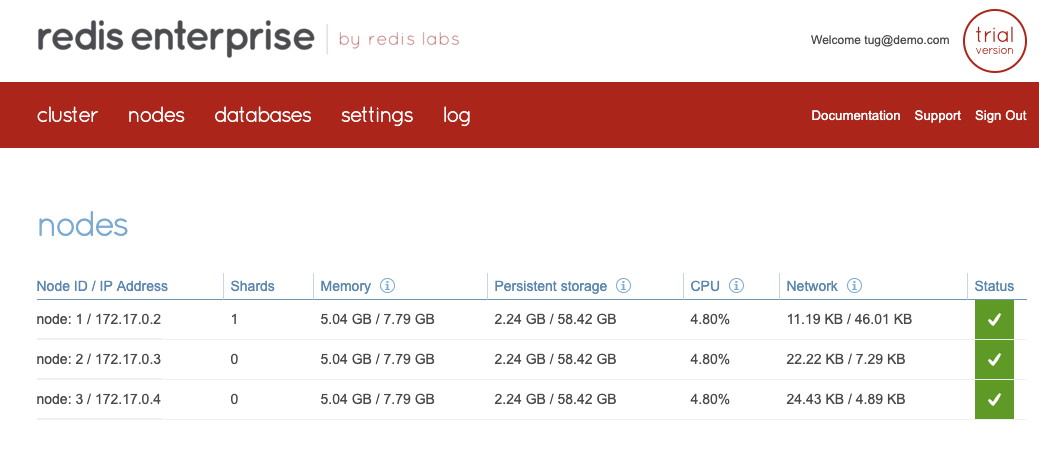
Your environment should look like this after the installation and configuration of the 3 nodes.
You can also reuse the rladminstatuscommand on one of the containers and see the new configuration.
If you look carefully, you can see that you have only 1 shard in your cluster. Let's now add a new shard to the database.
Enabling Clustering and Replication to the DB
In the Redis Enterprise Admin Web UI, (you can use any of the nodes):
- Click on the "databases" tab
- Click on "test-db-001" database
- Click on the "configuration"
- Go to the bottom of the page and click "Edit"
- Check the "Replication" checkbox, to create new shard that will be a replica, to provide high availability
- Check "Database Clustering" and increase the number of shards to 2. This will distributethe data in your database into 2 shards, this for better scalability. You can see that the UI indicated that you have 4 shards with replication*. Yes because you have a database that you have "divided in 2", and each of the portions of the database is replicated. (Also with the free version of Redis Enterprise you are limited to 4 shards, so do not be surprised if you can not increase the number of shards to more than 4)
- Click "Update" at the bottom of the page.
Go back to the "nodes" tab, and you will see that you have now 4 shards distributed on your 3 nodes.
Discovering the cluster topology
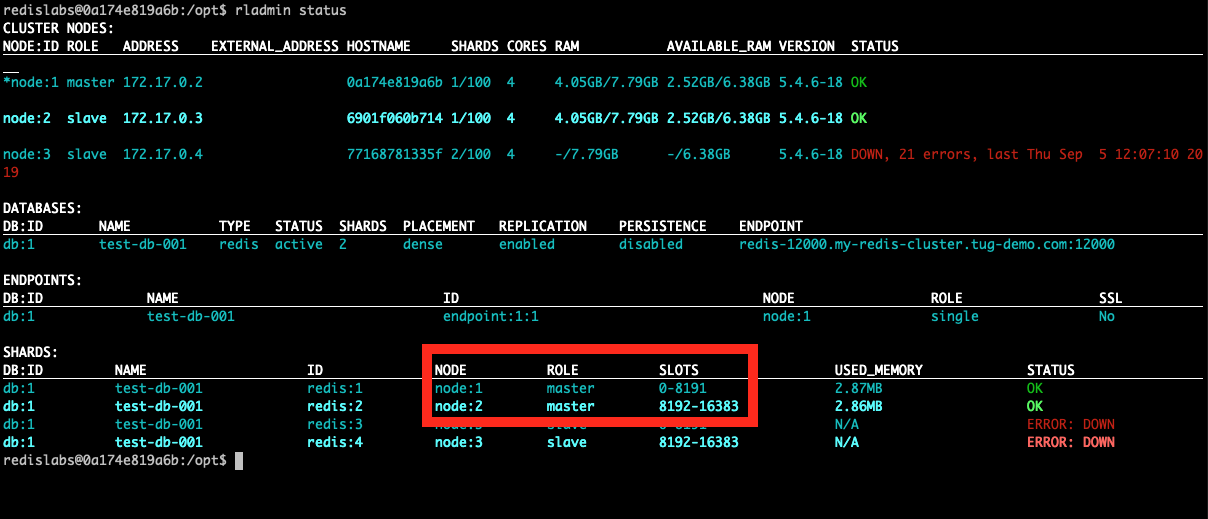
Run rladminstatusto inspect your cluster and see how the various components are installed:
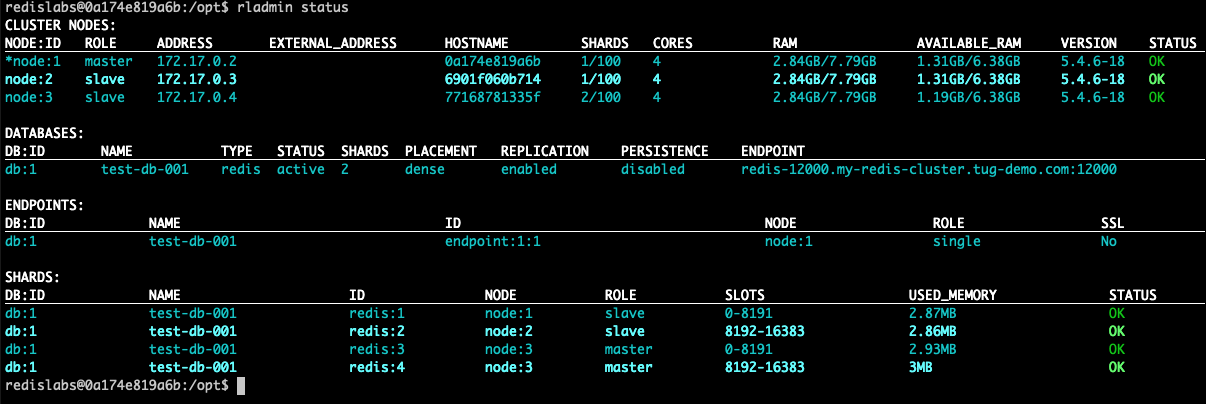
For example, you can see, that in my environment:
in the "CLUSTER NODES" section that the "node:1" is the master of the cluster in the "DATABASES" section that replication is enabled, and the database uses a "dense placement" in the "SHARDS" section you can see the various shards and their placement (node:1|2|3), their role (master|slave*) and their slots.
Using Redis Enterprise Enterprise Software (RS), all the clustering is managed transparently for you, and your applications. This means that you just have to connect your application to RS Cluster.
Clustering in Action
First of all, you have already seen a lot, just using the Web UI (and you could have done it using CLI and REST API), you have moved an existing database from a single instance to a distributed and highly available instance.
So now if something happens to the system, for example, if one of the masters disappears RS will automatically get another oneelected.
Let me kill for example the node 3 that contains the 2 masters for my database.
> docker killredis-node3
After a few seconds, you should see that the master shards are now on another node, in my case node:1.
So if an application, is using this cluster it would be almost transparent as the election of the new master is happening in the backgroud.
If you restart the node 3 it will rejoin the cluster, and the replicas will be updated on node 3 with any changes that happened to the masters.
> docker start redis-node3
The same automatic fail-over will happen if you kill a node with the cluster manager,or the endpoint.
Conclusion
In this small article you have learned how to:
- deploy a 3 nodes Redis Enterprise Server (RS) on Docker (on a single host)
- create a database, and make it highly available and distributed easily using the Admin UI
- look at the deployment using
rladminstatuscommand.
You have also seen, by killing some nodes, how the cluster fail-over will various master services (shards, endpoint, master cluster node) to another node automatically. This to ensure a continuity of service for your application.
In another postI will show what is the exact behavior of client applications during the fail-over.