Most of the applications have to deal with "master/detail" type of data:
- breweries and beer
- department and employees
- invoices and items
- ...
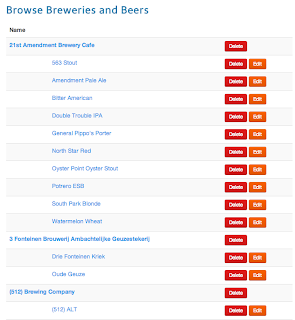
This is necessary for example to create application view like the following:
With Couchbase, and many of the document oriented databases you have different ways to deal with this, you can:
- Create a single document for each master and embed all the children in it
- Create a master and child documents and link them using an attribute.
In the first case when all the information are stored in a single document it is quite easy to use the entire set of data and for example create a screen that shows all the information, but what about the second case?
In this post I am explaining how it is possible to use Couchbase views to deal with that an make it easy to create master/detail views.
As an ex-Oracle employee, I am using the infamous SCOTT schema with the DEPT and EMP tables, as the first example. Then at the end I will extend this to the beer sample data provided with Couchbase.
The Data
Couchbase is a schema-less database, and you can store “anything you want” into it, but for this you need to use JSON documents and create 2 types of document : “department” and “employee”.
The way we usually do that is using a technical attribute to type the document. So the employee and department document will look as follow :
Department
{
  "type": "dept",
  "id": 10,
  "name": "Accounting",
  "city": "New York"
}
Employee
{
  "type": "emp",
  "id": 7782,
  "name": "Blake",
  "job": "Clark",
  "manager": 7839,
  "salary": 2450,
  "dept_id": "dept__10"
}
This shows just the document, in Couchbase you have to associate a document to a key. For this example I am using a simple pattern : type__id, for these documents the keys will look like the following:
You can use any pattern to create a key, for example for the employee you could chose to put an email.
Note the “dept_id” attribute in the employee document. This is the key of the department; you can see that as the “foreign key”. But remember, the relationship between the department and employee documents are managed entirely by the application, Couchbase Server does not enforce it.
I have created a Zip file that contains all the data, you can download it from here; and import the data into Couchbase using the cbdocloader utility. To import the data run the following command from a terminal window:
./cbdocloader -n 127.0.0.1:8091 -u Administrator -p password -b default ~/Downloads/emp-dept.zip
You can learn more about the cbdocloader tool in the documentation.
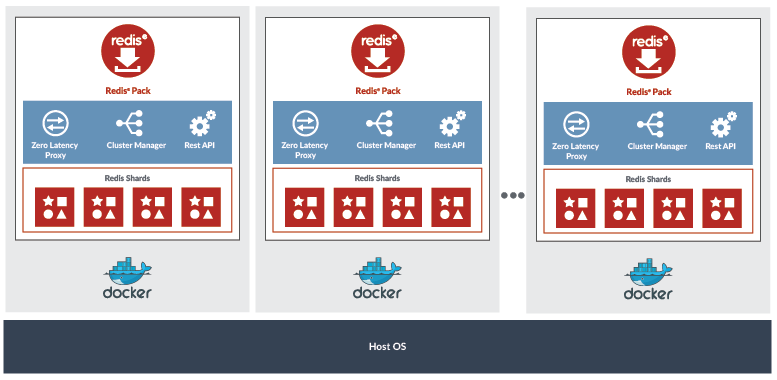
The View
Queries inside Couchbase are based on views; and views build indexes, so we have to create a view, a "collated view" to be exact.
The idea behing a collated view is to produce an index where the keys are ordered so that a parent id appears first followed by its children. So we are generating an index that will look like:
DEPT_10, Accounting
DEPT_10, Blake
DEPT_10, Miller
DEPT_20, Research
DEPT_20, Adams
DEPT_20, Ford
...
This is in fact quite easy to do with Couchbase views. The only trick here is to control the order and be sure the master is always the first one, just before its children.
So to control this we can create an compound key that contains the department id, a "sorting" element and the name (beer or brewery)
So the map function of the view looks like the following:
The key is composed of:
- the department id extracted from the department document itself or from the employee document depending of the type of document
- an arbitrary number that is used to control the ordering. I put 0 for the department, 1 for the employee
- the name of the department or the employee, this also allows to sort the result by name
In addition to the key, this view is used to emit some information about the salary of the employees. The salary is simply the sum of the salary plus thecommission when exists. The result of the view looks like:
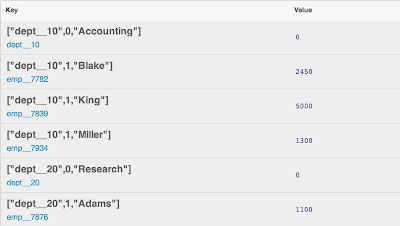
With this view you can now use the result of the view to build report for your application. It is also possible to use parameters in your query to see only a part of the data, for example by departement, using for example startkey=["dept__20",0]&endkey=["dept__20",2] to view only the data -Department and Employees- of the deparment 20-Research.
The Beer Sample Application
You can create an equivalent view for the beer sample application where you print all the breweries and beers in the same report. The view is called "all_with_beers" in the design document "brewery". The view looks like:
Once you have publish it in production you can use it in the Beer Sample application, for this example I have modified the Java sample application.
Create a servlet to handle user request and on the /all URI.
The "BreweryAndBeerServlet" that calls the view using the following code :
The result of the query is set into the HttpRequest and the all.jsp page is executed. The JSP uses JSTL to print the information using the following code:
The JSP gets the items from the HTTP Request and loops on each items, then based on the type of the item the information is printed. The final result looks like :
This extension to the Beer Sample application is available here :https://github.com/tgrall/beersample-java/tree/BreweriesAndBeers